Getting ready to launch a new website? It’s important to take the time to “QA” it before launching.
In this post we are going to review what QA testing is, why it’s important, and provide you an easy-to-follow QA checklist you can use before your next website launch.
Table of Contents
Let’s dive in…
What is website QA testing and why is it important?
QA testing stands “quality assurance” testing—sometimes also referred to as QC, or “quality control,” testing.
Here’s the basic idea: You’ll want to test your website before launching it. Duh.
It’s not uncommon to see more-than-usual traffic after a website launch, especially if you’ve been hyping up your launch. A website that doesn’t work properly can lead to lost trust, or worse, lost revenue.
What are the key elements of a website to QA before launching?
These are typically the elements that we’re reviewing before launching a website. This list may vary a little website-by-website depending on its functionality. With that said, websites typically share a lot of common elements regardless of the industry.
You’ll notice that there are a few things not on this list such as “clean, easy-to-understand navigation.” A well-thought out navigation is important, but it’s the sort of thing that one better had thought about wayyyy before building the website. Yes, we’re going to check whether the navigation works—but the design of the navigation should have been addressed in the planning of the website.
Mobile and Desktop Versions / Layouts: Mobile versions include phone and tablet views. Do not assume that if it works on desktop it also works on mobile (and vice-versa). We do our best to check everything on all versions of the website.
Calls-to-Action and Links: Click on every. single. link. And be sure to check the URL that it directs you to. A friend recently asked me to review his new website, and some of the links referred the user to the staging version of the website.
SEO Elements: We typically use our on-page optimization checklist to review the various SEO-related elements of each page (checking heading tag hierarchy, page titles and metas, etc.). You can learn more about how to optimize a website in our Content + SEO Course (WordPress version | Showit version). If you are on WordPress, tools such as RankMath can be really helpful. The bonus of optimizing for SEO is that you should also then be optimizing for user experience.
Functionality & Integrations: We want to make sure that the core functionality of the website actually works. That means testing every form and feature on the website. It can be tedious, but it’s worth testing every form.
E-commerce: If the website has a shop, you definitely want to make a test purchase. That way you can understand what the flow looks like for a visitor.
Tracking: Even if you’re not planning on running Facebook and Instagram ads, we typically recommend creating a Facebook Business Manager account and installing the Facebook Pixel (technically the Meta Pixel). That way your pixel is starting to gather data in case you ever decide to run ads. Regardless, you’ll most likely want to set-up Google Analytics. Be sure that tracking is installed and works before/when you launch.
Proofreading: Super simple and anyone can do it. If you’re the one that wrote all the copy on your website, we highly recommend finding a friend, peer, or team member to proofread for errors and clarity.
Some of our Favorite Website QA Testing Tools
These tools are not website testing tools, per se. However, they can be incredibly useful as you build, test, and check your website for errors.
RankMath: Our preferred SEO tool for WordPress and Showit websites with WordPress blogs.
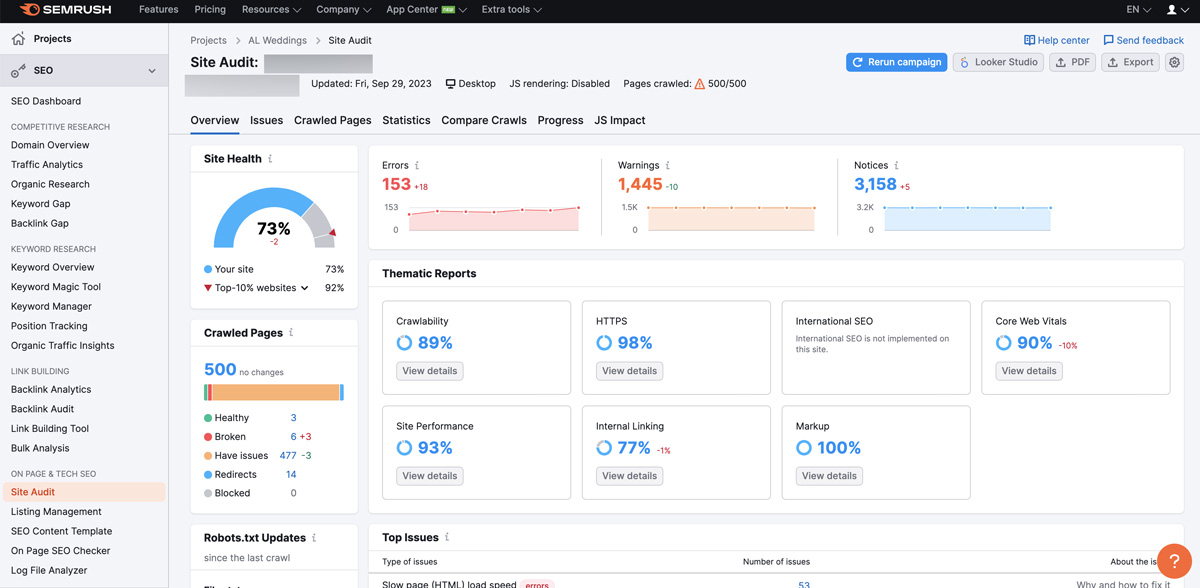
SEMrush: We typically run websites through a website audit tool like SEMrush immediately after its launched to catch any critical errors we may have missed during launch. Warning: If you’re not familiar with website auditing tools, this may not be helpful. Auditing tools are almost always going to return something. Knowing what the errors/warnings mean, whether they’re worth your time, and what to do about them requires a bit of know-how!

GTmetrix: GTmetrix is our preferred pagespeed test.
Broken Link Checker: This is a WordPress plugin that checks for broken links on your website. We highly recommend disabling/removing this plugin after you use it.
Meta Pixel Helper: The Meta Pixel Helper is a Chrome extension that checks for the Meta (Facebook & Instagram) pixel and pixel events.
A Comprehensive Website QA Checklist
The below checklist has been created to help you test your website before launching. The idea is that you can reuse this list on every page of your website. And to help you do this, we created a FREE printable version of this Website QA Checklist for you.
Responsive Across Devices
- Mobile version
- Tablet version
- Desktop version
Typography & Content
- Font is large enough to read easily.
- No more than 2-3 fonts have been used.
- Proofread: Grammar, spelling, and clarity.
- All content is complete.
Calls-to-Action (CTAs) and Links
- Every link has been tested and directs to appropriate page.
- At least one CTA on the page.
- CTA buttons are clearly buttons.
Functionality, Forms, and Integrations: The testing functionality checklist has been left a bit vague since it will vary from website-to-website.
- Form fields are clear.
- Forms cannot be submitted without required fields.
- Error message is clear when form is not submitted properly.
- Forms shows ‘success’ message or redirects when submitted.
- Form integrations work properly.
- Other integrations work: Email lists, pop-ups, quizzes, etc.
E-commerce and Shop testing
- All products are categorized and tagged (as needed)
- Filtering options work properly
- Prices are accurate
- Add-to-cart works
- Coupon and discount codes work (if applicable)
- Checkout is functional
- Transaction appears appropriately in commerce account (Stripe, PayPal, etc.)
- Integrations are working properly (as applicable—gift notes, send as gift, multiple shipping addresses)
Tracking and Analytics
- Tracking codes/pixels have been installed
- Google Analytics installed
- Google Search Console set-up and verified
- Google Business Listing set-up and verified
Page Details and Search Engine Optimization
- SEO checklist complete
- Optimized Page Title and Metadescription
- URL and permalink structure (optimized, matches old URL if page redesigned)
- Featured Image and/or Social Share Image defined
- Category and Tags defined (if applicable)
Tips for Testing Your Website Before Launching
After launching hundreds (or thousands?!) of websites, we’ve learned a thing or two about testing websites before launch. Here are our some of our best tips for ensuring a smooth website launch…
- The soft-launch: Launch your website a few days prior to your announcement to ensure that everything works.
- Avoid Fridays: If you launch or soft-launch on Friday, keep in mind that you may only have a few hours to test before support signs off for the weekend. Even if you’re not working with a designer or developer—if you’re launching with Showit or on a comparable website platform, support might be limited over the weekends.
- You’ll almost always find bugs, errors, and other things that need to be fixed. It’s normal. And this is why we recommend a soft-launch.
- Complete testing on the staging environment and the published version of the website. Yes, if it works on staging, it should theoretically also work when live… but that’s not always the case. Testing is tedious, but it can save you from headaches down the line.
- Test as you build. Sometimes testing can make you rethink how a part of the site ought to be designed, which is why it’s worthwhile to test things out as you build (when possible). If you’re working with a developer or designer: Keep in mind that they likely have their own testing protocols and it’s good practice to respect those.
Take our Website Conversion Assessment!
Get a FREE detailed report with actionable steps you can take to improve the conversion rate of your website by taking our Website Conversion Assessment.


VIEW THE COMMENTS
Add A Comment